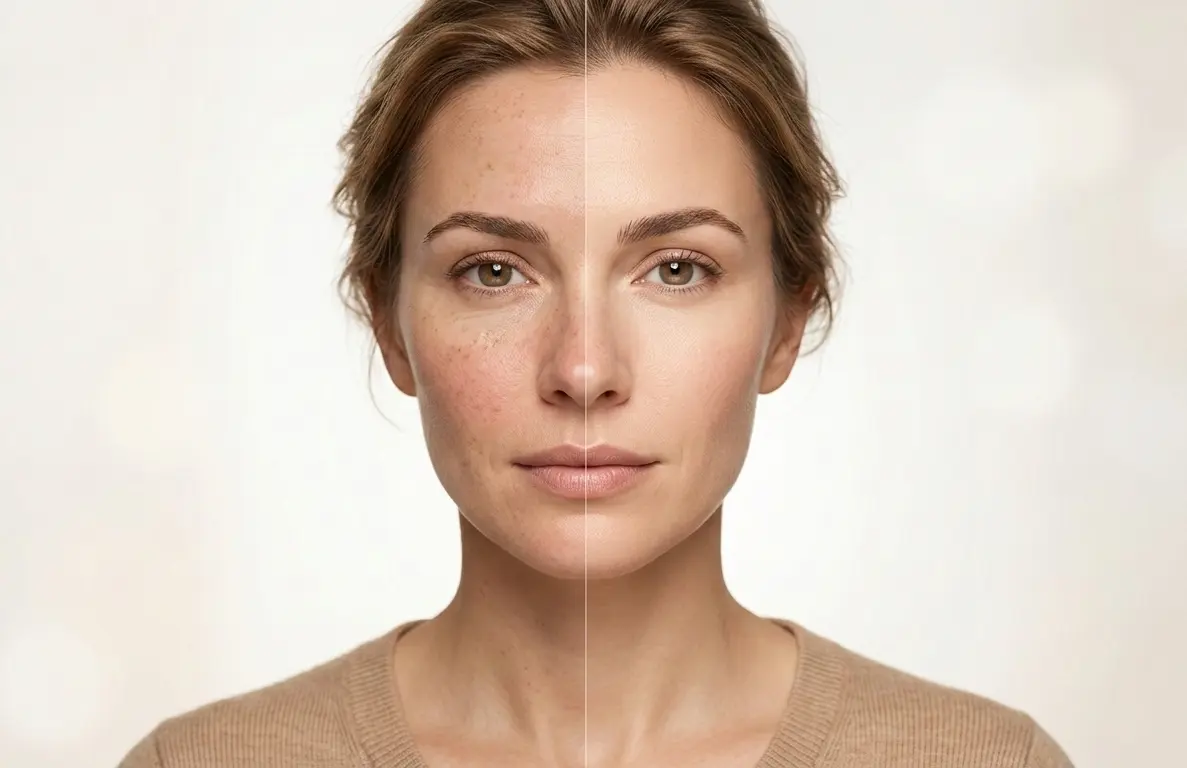
If you’re searching “Lumecca before and after,” you’re probably not looking for marketing fluff. You want the real story: What actually changes, how fast it changes, and what a fair “after” should look like.
In our day-to-day at Vital MedSpa, we see the same pattern: people love Lumecca when they understand the timeline and set the right expectations especially for sun spots, freckles, redness, and uneven tone. This guide breaks it all down so you can judge results like a pro (and capture your own before/after photos in a way that actually proves something).
What Is Lumecca IPL (and How Is It Different from “Regular IPL”)?
Lumecca is a type of IPL (Intense Pulsed Light) treatment. IPL isn’t a single-wavelength laser; it uses broad-spectrum light that can target different “chromophores” in the skin mainly pigment (melanin) and vascular redness (hemoglobin).
IPL vs laser (quick explanation)
- Laser: typically one wavelength; very specific target.
- IPL: multiple wavelengths; more flexible for mixed concerns like sun damage + redness in the same area.
That flexibility matters for “before and after” results because many people don’t have just one issue. It’s common to have:
- scattered brown spots from sun exposure,
- background redness,
- and uneven tone all at once.
How Lumecca targets pigment and redness (filters overview)
One practical differentiator you’ll see referenced with Lumecca is filter selection. In clinical settings (including how we approach it at Vital MedSpa), filters can be chosen based on the dominant concern:
- A filter commonly used for superficial pigment goals (often referenced around 515 nm)
- A filter commonly used for redness/vascular goals (often referenced around 580 nm)
That doesn’t mean one setting magically fixes everything it means treatments can be more tailored. And tailoring is one reason two people can get the same device and have very different “after” photos.
Another difference between “great before/after” and “meh” is simply patient selection and skin preparation. In our clinic, we spend real time aligning the plan with your skin tone, your sun habits, and the kind of discoloration you’re trying to treat because that’s what determines whether your after photo looks like a glow-up or just “a bit better.”
Lumecca Before and After: Results Timeline (Day 1 to Week 6)
The biggest misconception is thinking the “after” happens instantly. Your skin needs time to respond, and for pigment to surface and clear.
Immediately after (0–24 hours)
Right after treatment, it’s common to see:
- warmth (like a mild sunburn),
- pinkness/redness,
- mild swelling (especially around sensitive areas).
Some people notice their spots look darker quickly. That can be normal. What you’re seeing is pigment absorbing energy and moving toward the surface.
At Vital MedSpa, we usually remind clients: your “day-of” selfie is not your after photo. If you take a picture immediately post-treatment, label it clearly as post-procedure, not “results.”
Days 2–7 (what changes, what’s normal)
This is where the “before and after” journey starts to get interesting:
- Brown spots may look like peppered dots or a “coffee-ground” effect.
- Pigment may flake or shed gradually (don’t pick).
- Redness may settle, and skin tone can start to look more even.
What’s “normal” varies, but most people look socially presentable quickly, even if the skin is still processing changes. If you’re comparing your progress to online photos, remember: many galleries show the “after” at a few weeks, not a few days.
In our clinic experience, the best results come when people treat this week like a “calm skin” phase: simple skincare, hydration, and a very serious SPF habit.
Weeks 2–6 (when photos look most impressive)
This is when many before/after comparisons look dramatic:
- Skin tone can look brighter and clearer
- Spots can appear lighter or reduced
- Redness can look less noticeable
- Texture can look smoother (not always the main goal, but commonly reported)
If you’re trying to time your “after” photo, week 4 to week 6 is usually a sweet spot for many people especially if the goal is a more even tone.
A common pattern you’ll see in reputable galleries is labeling results by weeks after treatment and number of sessions (e.g., “6 weeks after the 3rd session”). That detail matters, because one session and three sessions are not the same promise.
What Improves Most: Sun Spots, Freckles, Redness, Rosacea, Uneven Tone
Not all discoloration behaves the same. “Lumecca before and after” results depend heavily on what you’re treating.
Pigment concerns (sun spots, freckles, sun damage)
Pigment that sits more superficially (like many sun spots and freckles) tends to show more satisfying before/after shifts. These are often the “wow” photo cases because:
- spots can darken briefly,
- then fade as the skin clears them.
If you’re chasing those clean before/after spot reductions, this is the category that often delivers.
Vascular/redness concerns (diffuse redness, broken capillaries)
Redness can respond beautifully too, but it’s sometimes subtler in photos because:
- lighting exaggerates or hides redness,
- skin can flush from heat/exercise/stress,
- and cameras auto-adjust color.
That’s why we encourage consistent photo conditions (you’ll get the exact checklist below). In-clinic, we often see clients notice redness improvements in real life before it shows up clearly in their phone photos.
A quick note on melasma
People often ask if Lumecca helps melasma. Melasma can be tricky and doesn’t behave like a basic sun spot. If melasma is your main concern, you’ll want a provider who screens carefully and plans conservatively, because certain triggers (including heat and light in some cases) can worsen it in susceptible individuals.
At Vital MedSpa, when someone mentions melasma, we treat that as a separate planning conversation not just “same settings, same plan.”
How Many Sessions Do You Need for the “After” Photo Look?
One reason “before and after” content feels confusing is that many posts don’t mention sessions. But sessions are the difference between “nice improvement” and “people asking what you changed.”
1 vs 2 vs 3 sessions (a realistic range)
Many clinics (including ours) commonly discuss 1–3 sessions as a typical range for noticeable results, depending on the concern and the starting point.
- 1 session: often visible brightening and early spot fading; great for “test drive” results.
- 2 sessions: more consistent tone correction; redness and pigment changes become easier to spot.
- 3 sessions: often where the “gallery-level” transformations appear for stubborn sun damage or more widespread concerns.
Why results vary (and why that’s not a red flag)
Two people can do the “same treatment” and get different after photos because of:
- skin tone / Fitzpatrick type
- how recently they’ve had sun exposure or tanning
- the depth of pigment
- redness that’s more diffuse vs more broken-capillary
- skincare, hormones, heat triggers, and consistency with SPF
This is also why cookie-cutter pricing promises or “one-size-fits-all” after photos can be misleading.
From our clinical perspective at Vital MedSpa, the best results come from matching the plan to the skin then protecting the investment with proper aftercare and maintenance.
What to Do Before Your Appointment (So Your “After” Looks Better)
If you want a great before/after, prep matters. “Before” is not only your baseline photo it’s also your baseline skin condition.
Sun/tan avoidance, skincare basics
Your results and safety are influenced by sun exposure. In general:
- Avoid tanning and intense sun exposure before treatment.
- Keep skincare gentle if you’re prone to sensitivity.
- Share what you’re using (especially exfoliants or actives).
A common reason people don’t love their “after” is that they treat their skin like it’s business-as-usual, then wonder why it feels reactive. Calm skin photographs better and heals more predictably.
What to tell your provider
To get the safest and cleanest outcomes, disclose:
- recent peels, lasers, or injectables,
- history of hyperpigmentation,
- cold sores (if relevant to the area),
- medications and topical routines,
- any melasma history or pregnancy/postpartum pigment changes.
At Vital MedSpa, we’d always rather hear “too much information” than miss a detail that changes how we treat because that’s how you get results that look good in real life and in photos.
Aftercare: The Do’s and Don’ts (Makeup, Sun, SPF, Downtime)
Aftercare is where the before/after either locks in… or drifts back.
Makeup timing + sun avoidance/SPF
Many clinics advise that makeup is often okay the next day, but your provider’s guidance should lead especially if your skin is reactive.
Sun is the bigger issue. If you want your after results to last:
- Treat SPF like a daily essential, not an optional.
- Avoid intense sun exposure soon after treatment.
- Don’t chase “a little glow” from the sun right after you’ve paid for a tone-correction treatment.
In our clinic workflow at Vital MedSpa, we emphasize sun protection because it’s the single easiest way to protect pigment improvements. You don’t need a complicated routine just consistency.
Common side effects and what’s normal
Often-reported post-IPL experiences include:
- mild redness and warmth,
- temporary swelling,
- pigment darkening before it fades,
- dryness or mild flaking.
What’s not the vibe: aggressive scrubbing, picking at flakes, or experimenting with new actives immediately after.
If you want a clean before/after photo set, your job is basically: let the skin do its thing, and protect it while it does.
How Long Do Lumecca Results Last (and How to Maintain Them)?
This is the question nobody asks until they love their after photo.
Results can last months, but longevity depends on:
- how much sun exposure you get,
- whether your pigment is sun-driven,
- your skincare habits,
- and whether you do maintenance.
Maintenance sessions and smart expectations
For many people, the best plan is:
- do an initial series (often 1–3 sessions),
- then maintain periodically depending on how quickly discoloration returns.
If you live in a sunny climate, spend time outdoors, or don’t use SPF consistently, your “after” can fade faster not because the treatment didn’t work, but because the cause (UV exposure) is still active.
Don’t treat “duration” as a guarantee
You’ll sometimes see websites suggest a fixed duration (like “9–12 months”). Treat that as a ballpark, not a contract. Your lifestyle and biology matter more than a number.
At Vital MedSpa, we frame it simply: results last longer when you protect your skin like you want your skin to stay improved.
Lumecca Before and After Photos: How to Take Them Correctly
Most “bad before/after” comparisons aren’t because the treatment failed they’re because the photos are dishonest (even unintentionally).
The photo checklist (do this every time)
To capture real changes:
- Use the same room and the same lighting (bathroom lighting is usually terrible).
- Stand the same distance from the camera.
- Keep your chin angle consistent.
- Pull hair back; remove glasses.
- Avoid makeup or tinted sunscreen in the photo.
- Take photos at the same time of day (morning is best).
If you do this, you’ll catch subtle improvements like less background redness and smoother tone things that are easy to lose in random lighting.
When to photograph (the schedule that makes sense)
Here’s the simplest schedule:
- Baseline: right before your first treatment.
- Week 2: early visible improvements start to show.
- Week 6: a great “after” checkpoint.
- If you’re doing multiple sessions, repeat week-6 photos after each session.
This is basically how high-quality galleries label their before/after timelines because it makes results interpretable.
In our clinic at Vital MedSpa, we love when clients follow a consistent photo routine because it turns “I think it’s better?” into “Oh wow, it’s clearly better.”
FAQs
Many people describe it like a quick rubber-band snap sensation. Comfort varies by area and sensitivity. A good provider will adjust settings and communicate throughout.
IPL candidacy can depend on skin tone and recent sun exposure. Many clinics consider it best suited for lighter to medium skin tones, but the right approach starts with an in-person assessment and conservative planning.
Often minimal, but expect temporary redness and possible pigment darkening before it clears. Plan around events accordingly your “after” is usually not the same day.
Many people resume normal activities quickly, but you’ll want to follow post-care guidance, especially around sun exposure and skincare actives.
Sweat and heat can irritate sensitive skin in the first day or two. If you’re prone to flushing or redness, consider keeping workouts gentle for a short window.
Conclusion
A good “Lumecca before and after” isn’t just about the device it’s about the timeline, the right candidate, and the aftercare. If you take photos consistently and judge results at the right checkpoints (week 2 and week 6 are solid), you’ll understand your progress without guessing.
From what we see in clinic at Vital MedSpa, clients get the best outcomes when they treat Lumecca like a tone-correction investment: plan the sessions realistically, protect the skin from sun, and let your skin do the slow, visible work over a few weeks.